
Don’t just create a finished basement, create a lower level that discovers new, livable space and increases the value of your home at the same time.
“What do you mean you can’t find the electrical source? How is that not possible?”, I asked my electrician while we stood in our dark basement. It should also be noted that both doorbells and a few random switches on the second floor weren’t working either…
“You guys need to tear out a portion of the ceiling and most of the walls”, was his response, my mouth agape. “Look, you have five or six ungrounded fixtures and outlets and a 1980s tube TV that’s built into the wall, along with it’s plug. You have several fire hazards here.”
Is that all?
The tube TV was painted pink and the previous owner’s attempt at a flat screen, since it was literally flush with the wall. My friend Caroline said it made our basement look like the Hatch in Lost. It worked and I kinda liked it – but it would have to go, along with the finished basement and some of our home’s value. Did I mention that the water meter was also sealed behind a basement wall too?
Previous generations used basements primality for storage, laundry, and going to the bathroom! (I was told by a local architect that there are ordinances for both South Orange and Maplewood that dictate that all basements have a bathroom. This was so that the builders had a place to go.) So, how to create a lower-level? And what makes it different from a basement?

Fast forward two or three years to when we finally saved enough money for our finished basement. The best thing about an unfinished basement is that it’s a blank canvas – if you can dream it, pin it on Pinterest, or save it to Houzz.com board, you can do it. And we envisioned A LOT for this finished basement reno – a wet bar, a home theater system, a full bath with a urinal, steam shower and built-in bench, a walk-in pantry, toy storage, built-in desks, even a Murphy bed! Jung Lee Masters, our architect, worked it all in. What we didn’t work in was expense.
While I had managed house projects before, a few pretty big, I cut my teeth on the finished basement project. I was determined to get as much as I possibly could and that meant I would have to negotiate with my GC and Gary and I would have to prioritize our list from crazy to reasonable.
“Need, not want. Need, not want”, I chanted over and over. The built-ins, wet-bar, steam shower with built-in bench and urinal, and Murphy bed had to go.
My addiction to Houzz.com paid off – there were so many creative ways to utilize basement space. Like putting the washer and dryer and toy closet under the stairs. Jung created a laundry hall that was elegant and space-efficient. It had a wall of three closets, a sink with one of those industrial fixtures, and a washer and dryer beautifully tucked into that awkward space under the stairs.
Since most old homes don’t have good closet storage, refinishing the basement gives you the opportunity to incorporate them in ways that you need them most. Walk-in pantry. Check. Toy storage. Check. Utility closets. Check and check.
The full bath was a must. Gary’s Chicago family frequented our home and shared one 2nd floor bath with our three kids. That’s fine and all while they’re little kids, but as teenagers? Yikes. It just so happens that some of the most affordable tile choices out there also happen to be the trendiest and most classic – the shower got subway tile and the floor got hex-tile – all with dark gray grout. We added a teak bench from Home Goods.

The toy closet was on the other side of the washer and dryer. It was outfitted with three shelves and the doors were painted with chalkboard paint.
Happy Accident: During the demo process, the door frame to the basement caved in. When I saw the space without the frame it was amazing! It opened up the space and allowed for a much easier flow between the kitchen, mudroom, and basement. It was now a true lower level.
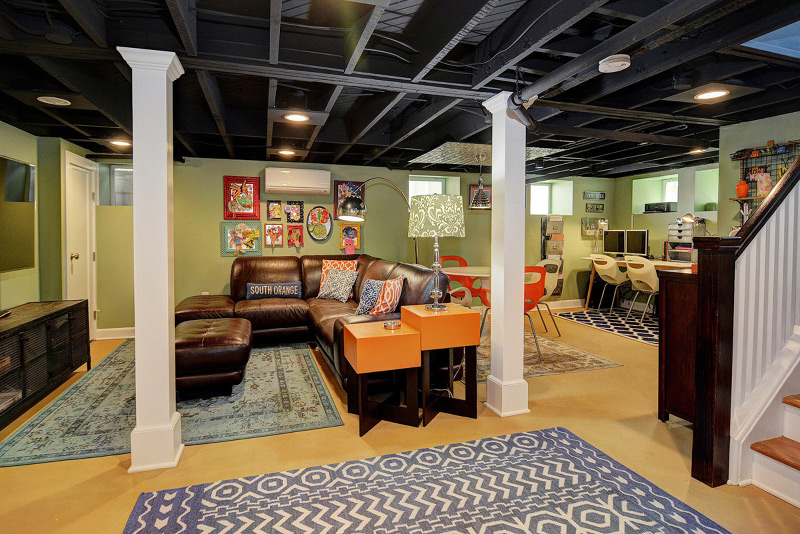
Paint choice and furniture placement was key in making this newly created space unique and inviting. We used Benjamin Moore Affinity – each color in the system is designed to complement each other. We used Fiji, Buttered Yam, and Seedling. Each of theses colors is vibrant – perfect for rooms with small window wells.
Rather then finish the ceiling, we had it professionally spray painted matte black. Because the ceiling height was only 7.5 feet, this gave the appearance of more height. Also, we were planning to renovate the kitchen in a year or two and not having the ceiling covered with sheetrock would make it more accessible to future plumbing and electrical work.
The great room was divided into 3 sections – TV, eating/crafting table, and office. True to my esoteric taste, I filled the main section of the room with a mix of antiques contemporary pieces – from flea market finds to IKEA.